

My husband was recently out of town on business. Normally his trips are a Monday through Friday affair and with little exception things run smoothly in his absence. This trip, however was a bit more extensive with him leaving on a Friday and returning the following Saturday. Initially this did not seem daunting until it dawned on me that I would have to entertain my children for two whole days without the assistance of husband, school, or extra-curricular activities. In speaking my boys it became abundantly clear that they wanted to do only one thing: Go to the pie place. The pie place is a restaurant here in town called Shari's (this may be a chain-not sure), and going to the pie place involves getting more than just pie. It involves, pie and happy faced pancakes. Sadly given the long week ahead of us this was financially not an option. Being the clever mommy that I am I decided to make a pie. Fortuitously I had all the ingredients on hand for a pumpkin pie. I will post the recipe for the pumpkin pie in a few days, but first I wanted to talk about crust.
People are I think unnecessarily frightened of making their own pie crust, but it really is quite easy. The keys to a good pie crust is to just chill. Chill your butter, chill your shortening and chill your water. Overall, just chill out. So what if it does not look perfect, most of it will be under your pie and that little bit that exposed to the eye will soon be eaten! So, don't sweat it...just chill.
I have posted a Single Pie Crust in the past and yes, it is the same recipe, but this time I have pictures of the step by step process of making the pie crust. Of course as I sit down to create this post I am suddenly aware that I neglected to take a photo of the baked empty pie crust. Sigh, I will get this multi photo thing eventually. Instead above you can see the pre-baked version. You will have to wait until I post the finished pumpkin pie to catch a glimpse of the baked crust.
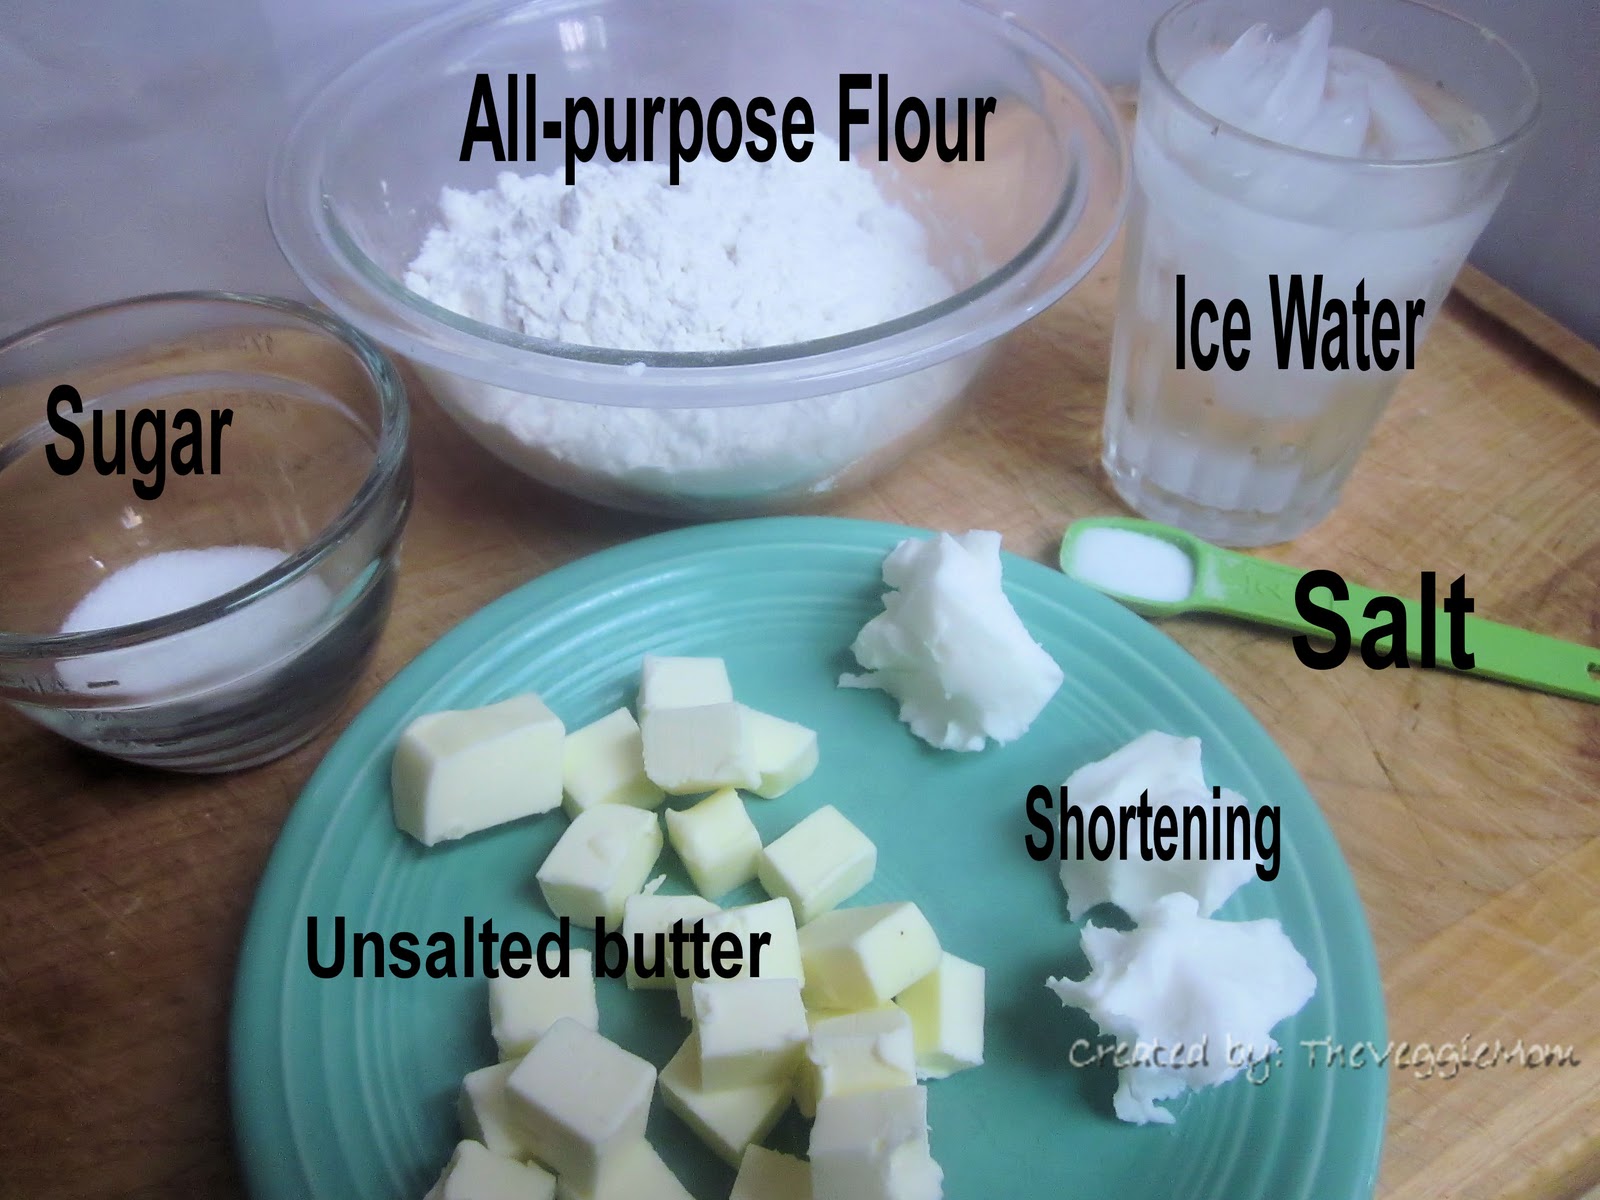
Single Pie Crust
1 1/4 cups all-purpose flour
1 tablespoon sugar
1/2 teaspoon salt
3 tablespoons vegetable shortening, cut or pinched into small pieces and chilled
5 tablespoons unsalted butter, cut into small pieces and chilled
4-6 tablespoons ice water
 |
| Flour mixture processed with shortening and butter: should resemble coarse crumbles |
Process the flour, sugar, and salt together in a food processor until combined. Scatter the shortening over the top and process until the mixture resembles coarse cornmeal. Scatter the pieces of butter piece over the top and pulse the mixture until it resembles coarse crumbs. Transfer the mixture to a medium bowl.

Sprinkle 4 tablespoons of ice water over the mixture.

Stir and press the the dough together with a stiff rubber spatula, until the dough sticks together. If the dough does not come together, stir in the remaining water, 1 tablespoon at at time, until it does.

Turn the dough out onto a piece of plastic wrap and flatten into a 4-inch disk.

Wrap the dough tightly in the plastic wrap and refrigerate for about 1 hour. Before rolling out the dough you can let it sit on the counter to soften up. I prefer the dough to be well chilled when I roll it out.

Roll the dough out into at least a 12 inch circle. I usually end up rolling the dough out to a circle a little larger than 12 inches in diameter. This is where taking photos of the cooking process became extra hard. Firstly, where I roll out my dough is an extremely poorly lite area of my kitchen. Secondly, you need two hands to roll out dough and one hand to hold a camera. I am sadly one hand short, but I did my best.

Pick you the rolled out dough my rolling it onto the rolling pin. Then unroll the dough onto/into the pie plate. Gently push the dough down into the pie plate, and trim over any extreme excess.
Fold over the edges of the pie dough and crimp or pinch the edges to make it all beautimous. At this point you need to determine if you are going to need to pre-bake you pie crust before putting your filling into it. Your pie recipe will instruct you on whether of not your need to do so. In general pre-baking helps to assure that your pie crust does not get too soggy when you back the entire pie. Before you bake the pie, cover it with aluminum foil and place it in the freezer until it is firm to the touch, about 30 minutes.

Remove the pie crust from the freezer and it is ready to use. If you are pre-baking the pie crust first move your oven rack to the lower middle position and preheat your oven to 375 degrees. Pierce the pie crust with a fork and re-cover it with the double layer of aluminum foil, and fill it with pie weights. I recently purchased the pie weights pictured above at Sur le Table, but you can get them elsewhere. If you do not have pie weights, you can use dry beans or dry rice in place of the pie weights. If you do use beans or rice you will need to cover the beans and rice with another layer of foil and you will be unable to use the beans and rice as food. You need not cover the pie weights.
Bake the crust for 25 to 30 minutes or until the crust is dry and light in color. Transfer the pie crust to a wire rack and remove the weights and foil. Fill the pie and bake according to the pie recipe.
No comments:
Post a Comment
Note: Only a member of this blog may post a comment.